


Photographing a house starts with deciding what the finished images need to explain: its layout, architecture, materials, outdoor spaces, and setting. Prepare the property before the camera comes out, schedule important rooms around their light, and build a sequence that helps someone understand the home without walking through it.
For a luxury residence, that usually means more than a wide photograph of each room. A glass wall opening onto a terrace, a carefully detailed kitchen, or a hillside view may need its own composition. The goal is a complete, accurate account of the property, with enough variety for the intended listing, architecture portfolio, or location-marketing campaign.
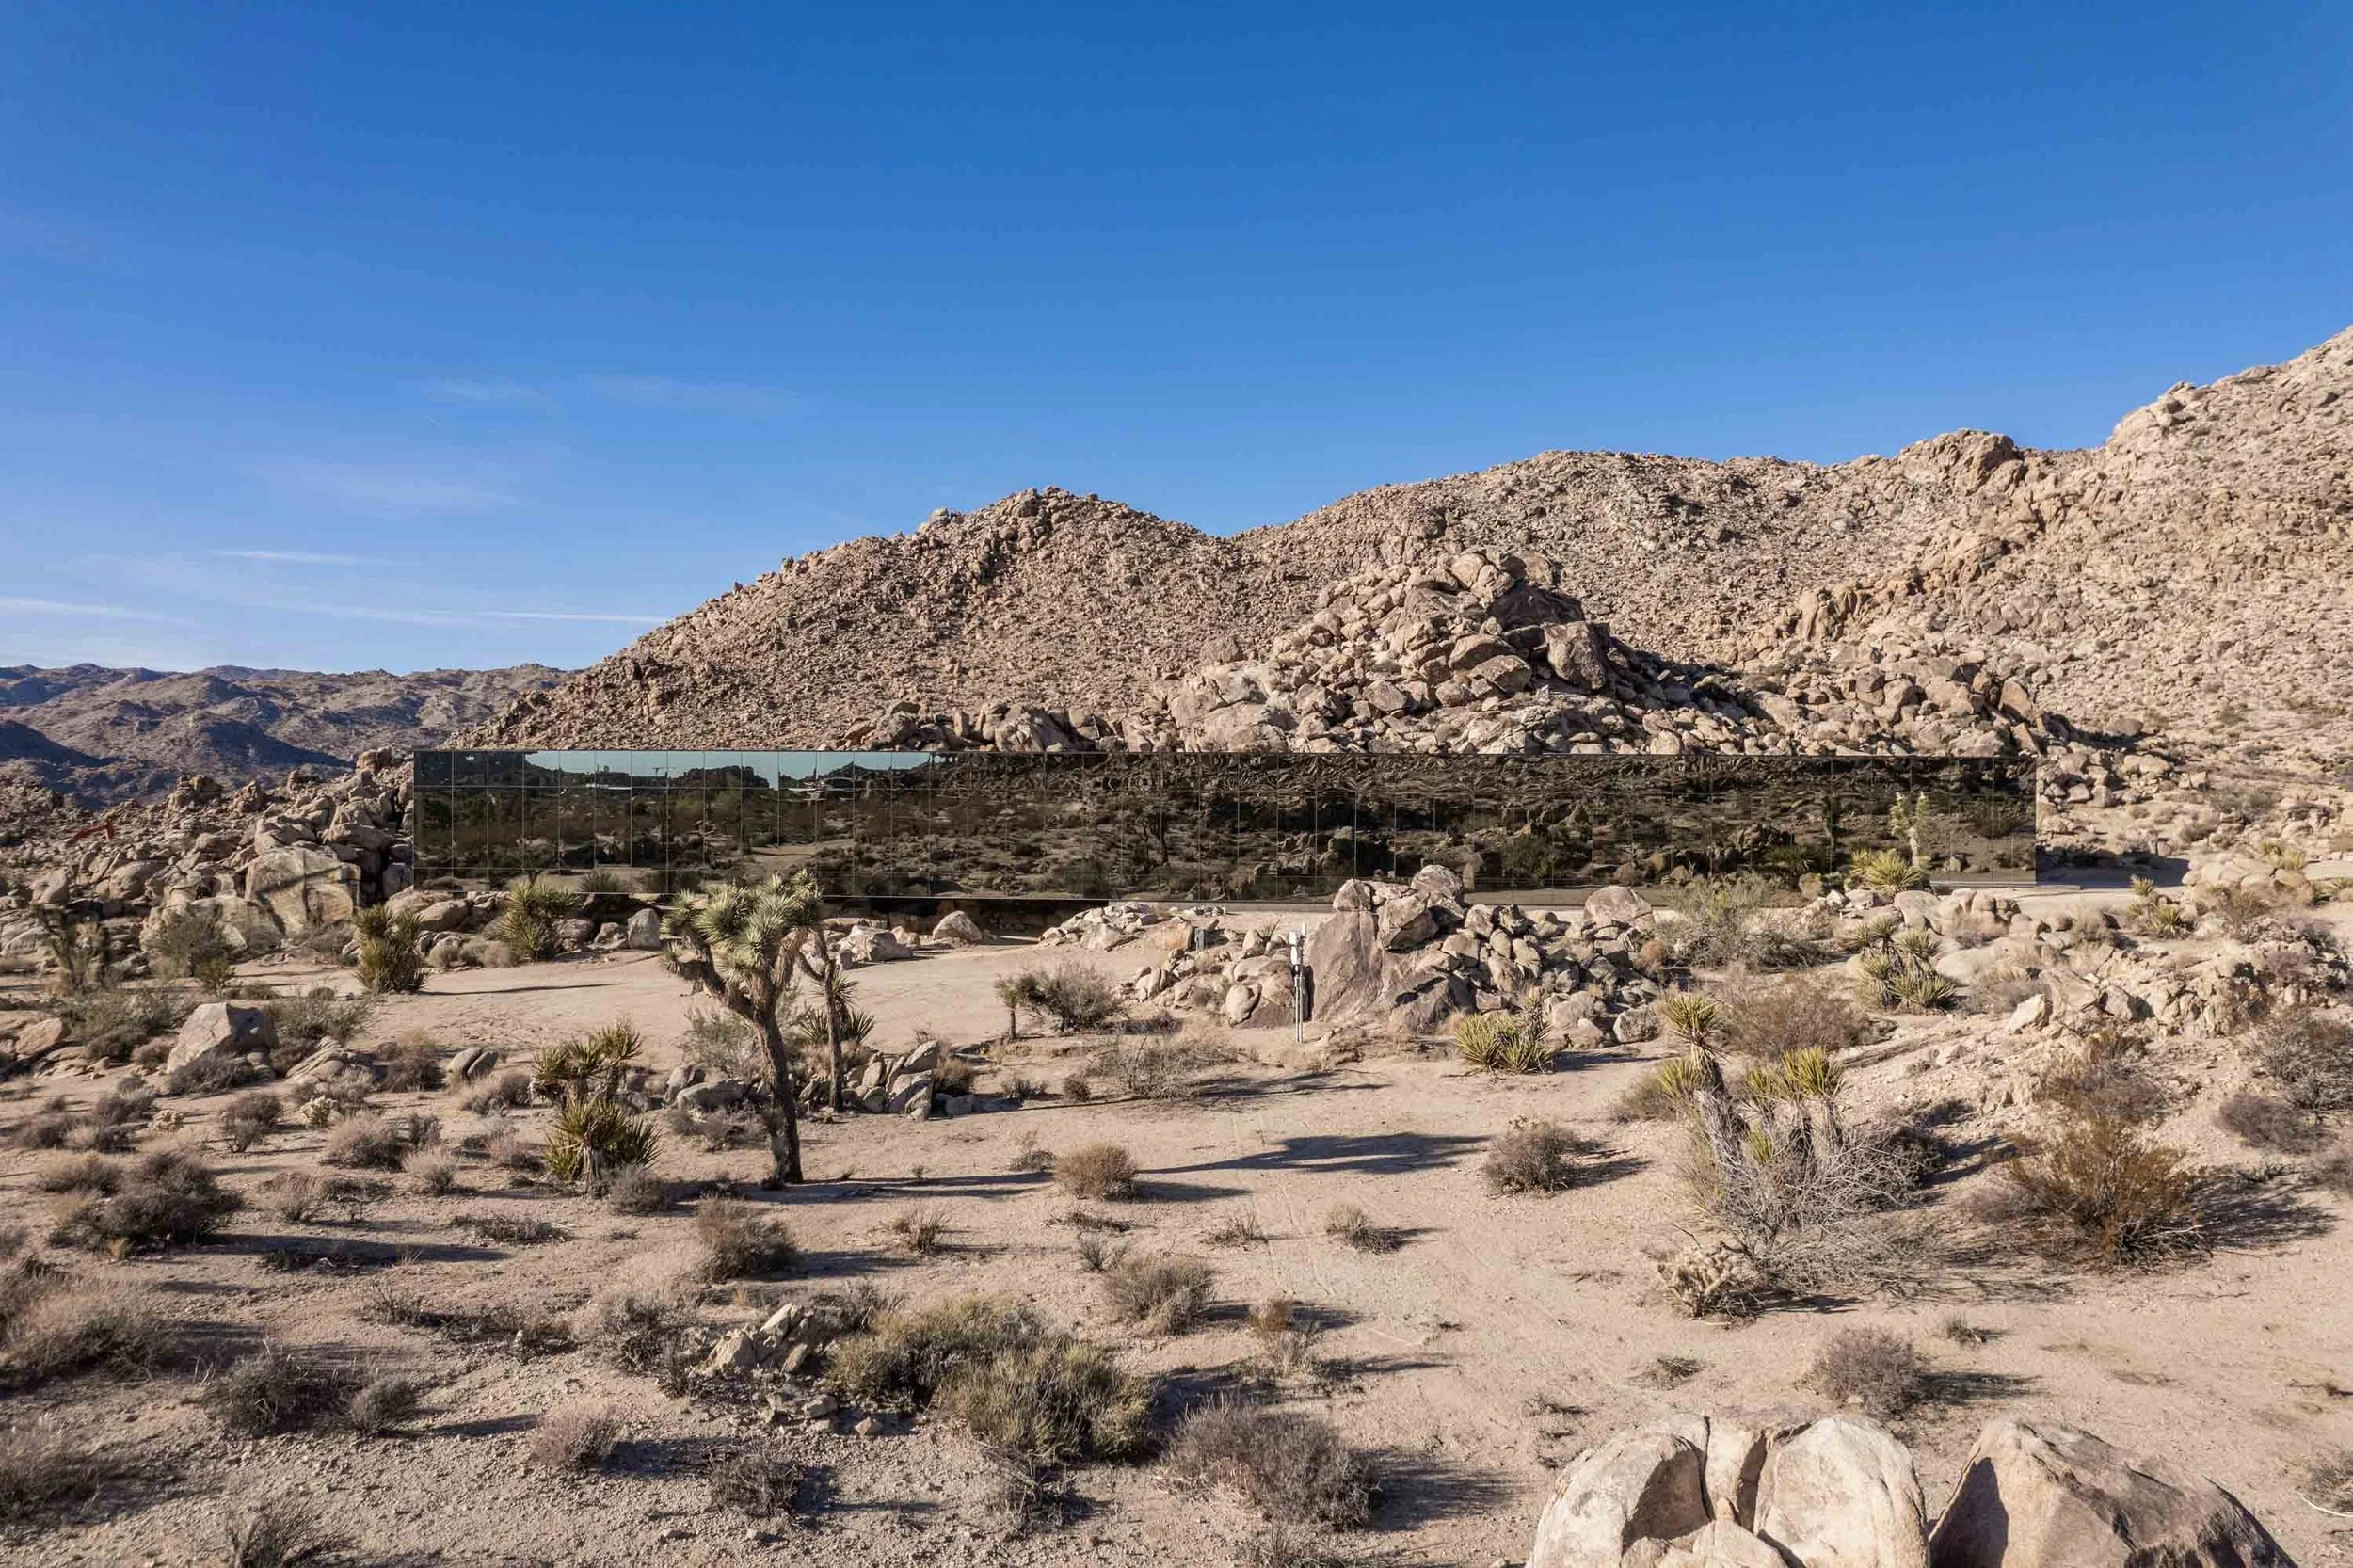
Our luxury residential portfolio includes The Flicker Estate in Bel Air, The Invisible House in Joshua Tree, and Nightingale Ultra Modern Estate in Los Angeles. The photographs below show how different homes call for different coverage decisions.
Start with the property's purpose and strongest features
A sales listing needs to explain the rooms and their relationship to one another. An architect's portfolio may place more emphasis on the building's form, materials, and response to its site. A film-location library needs clear views of spaces a production team might use. Confirm the audience before choosing the shot list.
For Nightingale, our published project describes photography for film-location marketing, covering architecture, views, the pool, and interiors. The Invisible House project combines photography and film to show mirrored architecture within a desert landscape. At The Flicker Estate, the documented scope includes wide architectural views, material details, and aerial coverage. These are different briefs, even though all three properties are luxury homes.
Walk the property with the owner, agent, or designer. Identify the views that distinguish it, rooms that need more explanation, and spaces that will be unavailable. Ask where the images will appear and whether the campaign also needs property films, vertical edits, or aerial photography.
Prepare the home before the photography window
Preparation should be finished before the best exterior or interior light arrives. Cleaning, styling, maintenance, and photography all require access to the same spaces. Schedule them in an order that lets the photo team work through rooms that are ready.
Remove loose cables, cleaning supplies, packaging, and personal paperwork. Clean windows and mirrors, straighten bedding, align chairs, and check lamps. Clear enough counter space to show the kitchen's actual surfaces. Keep intentional furnishings and selected objects when they help explain the room's use or design.
Outside, arrange furniture, remove pool equipment that is not part of the intended presentation, sweep terraces, and confirm that landscape lighting works. Keep vehicles clear of planned facade views. For occupied homes, agree on which personal possessions should remain out of frame and which rooms are off limits.
Avoid moving valuable art or heavy furniture without the owner's direction. A useful handoff is a short list of ready rooms, remaining tasks, access arrangements, and the person who can approve adjustments during the shoot.
Build a room-by-room shot list
Start with one clear overview of each important space, then add another angle only when it explains something the first cannot. A second kitchen view might show pantry access; a reverse living-room angle might explain the connection to the entrance. Repeated wide views with little new information make the final gallery harder to navigate.
| Space | Coverage to plan | What to resolve before the shoot |
|---|---|---|
| Exterior and arrival | Main facade, approach, entrance, relationship to the site | Vehicles, landscape readiness, direction of light |
| Living and dining | Room overview, connections between spaces, useful view toward outdoors | Furniture placement, curtains, open or closed doors |
| Kitchen | Overall layout, island, cabinetry, selected materials | Clear counters, appliance presentation, reflections |
| Primary suite | Bedroom proportions, window outlook, adjoining terrace or sitting area | Bedding, personal items, access to connected spaces |
| Bathrooms | Layout, vanity, shower or tub, distinctive finish | Mirrors, glass, towels, camera reflections |
| Outdoor areas | Pool, terrace, dining, garden, usable connections to the house | Furniture, water features, lighting, weather |
| Special spaces | Office, theater, gym, wine room, guest accommodation if present | Operating lights, screens, access, intended use |
| Details | Materials, built-ins, lighting, architectural junctions | Which details matter to the brief and who should be credited |
Use this as a planning framework, not a fixed package. A compact home and a large estate will need different numbers of finished photographs. Scope the deliverables around the property and its intended use.
Planning a residential shoot? Send us the property and your priority spaces so we can help define the finished photo, video, and aerial deliverables.
Show how indoor and outdoor spaces connect
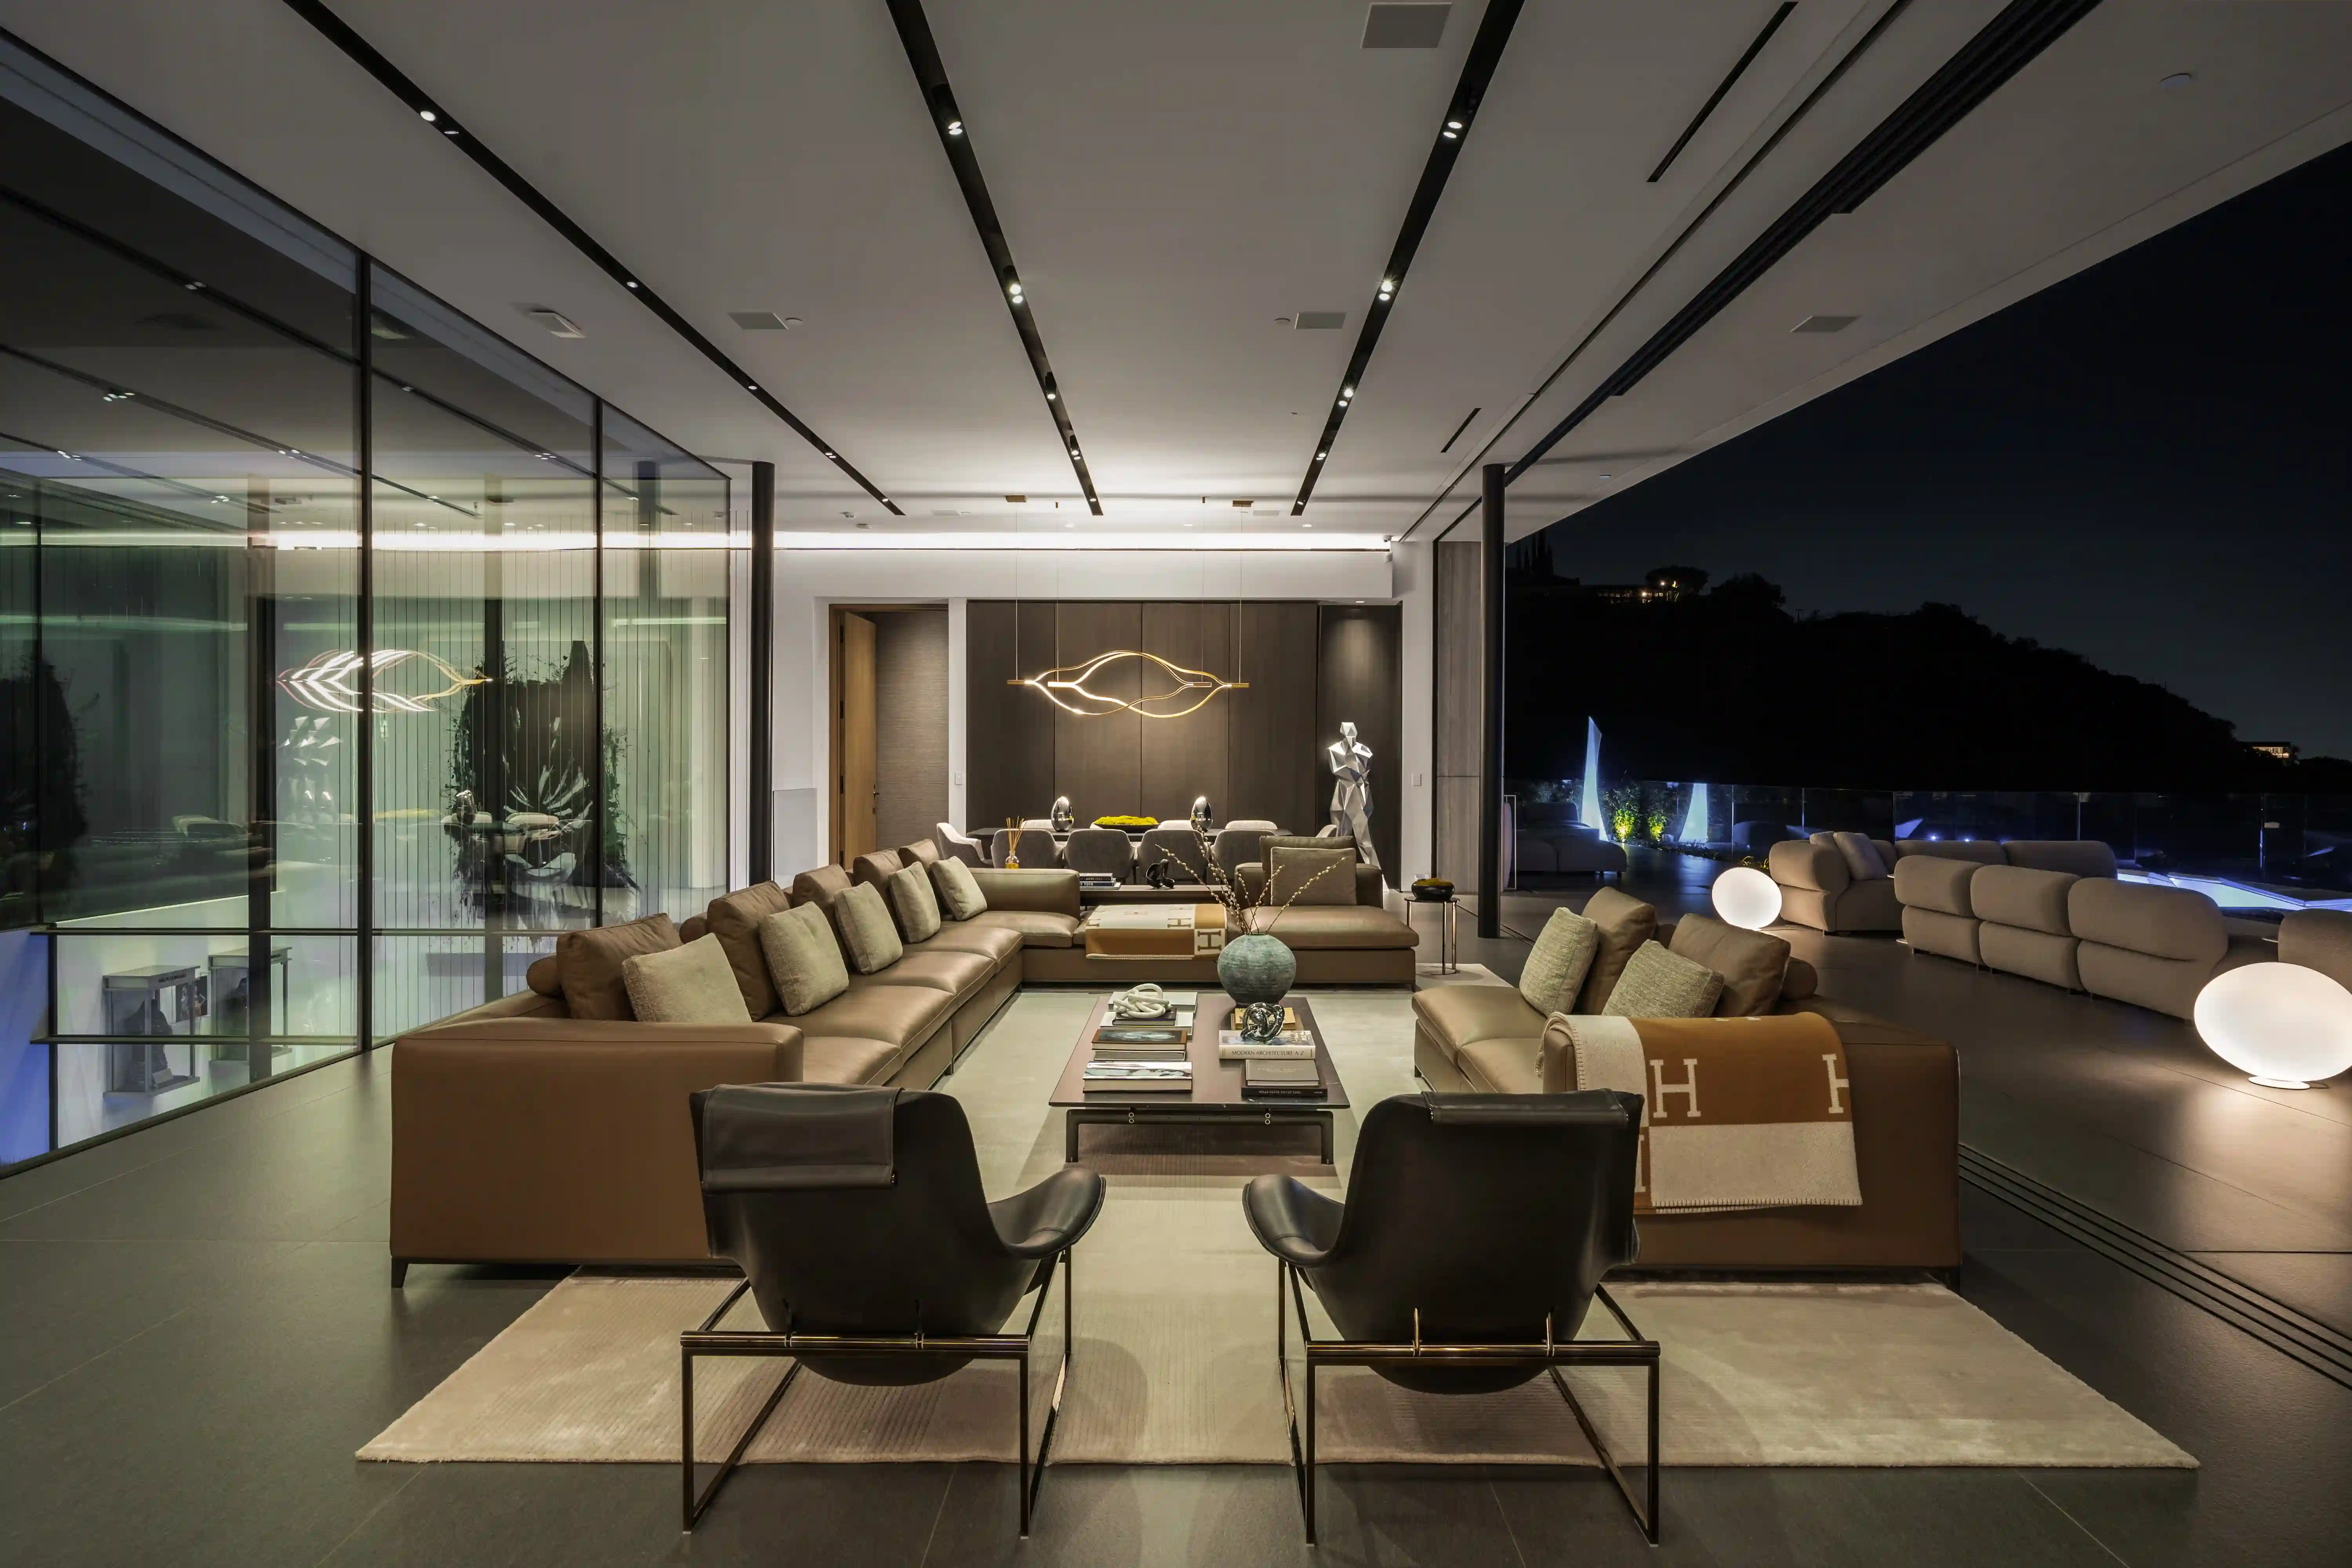
An open glass wall can be one of the most useful views in a luxury home. Choose a position that shows both the interior and the destination beyond it. Include enough floor, ceiling, and furniture to make the relationship understandable, rather than letting the exterior view become a bright rectangle behind an indistinct room.
At Nightingale, the living-room photograph below shows seating, the roof structure, and the adjoining terrace in one frame. That relationship is more informative than separate close views of a sofa and an outdoor chair. Our coverage also included daytime interiors and evening views, giving the location library more than one presentation of the property.
Schedule rooms around light, not a fixed route
Walk through the house before committing to a room order. Look at the direction of the windows, the strength of direct sun, and whether important views disappear into glare at certain times. The best exterior window may arrive before the interiors are ready, so protect it in the schedule.
Natural light can give a room a clear sense of atmosphere, but leaving every light off is not a universal rule. Built-in lighting may be part of the architecture. Test the practical lights and decide whether they support the room or create distracting color differences. Keep the treatment consistent across related views.
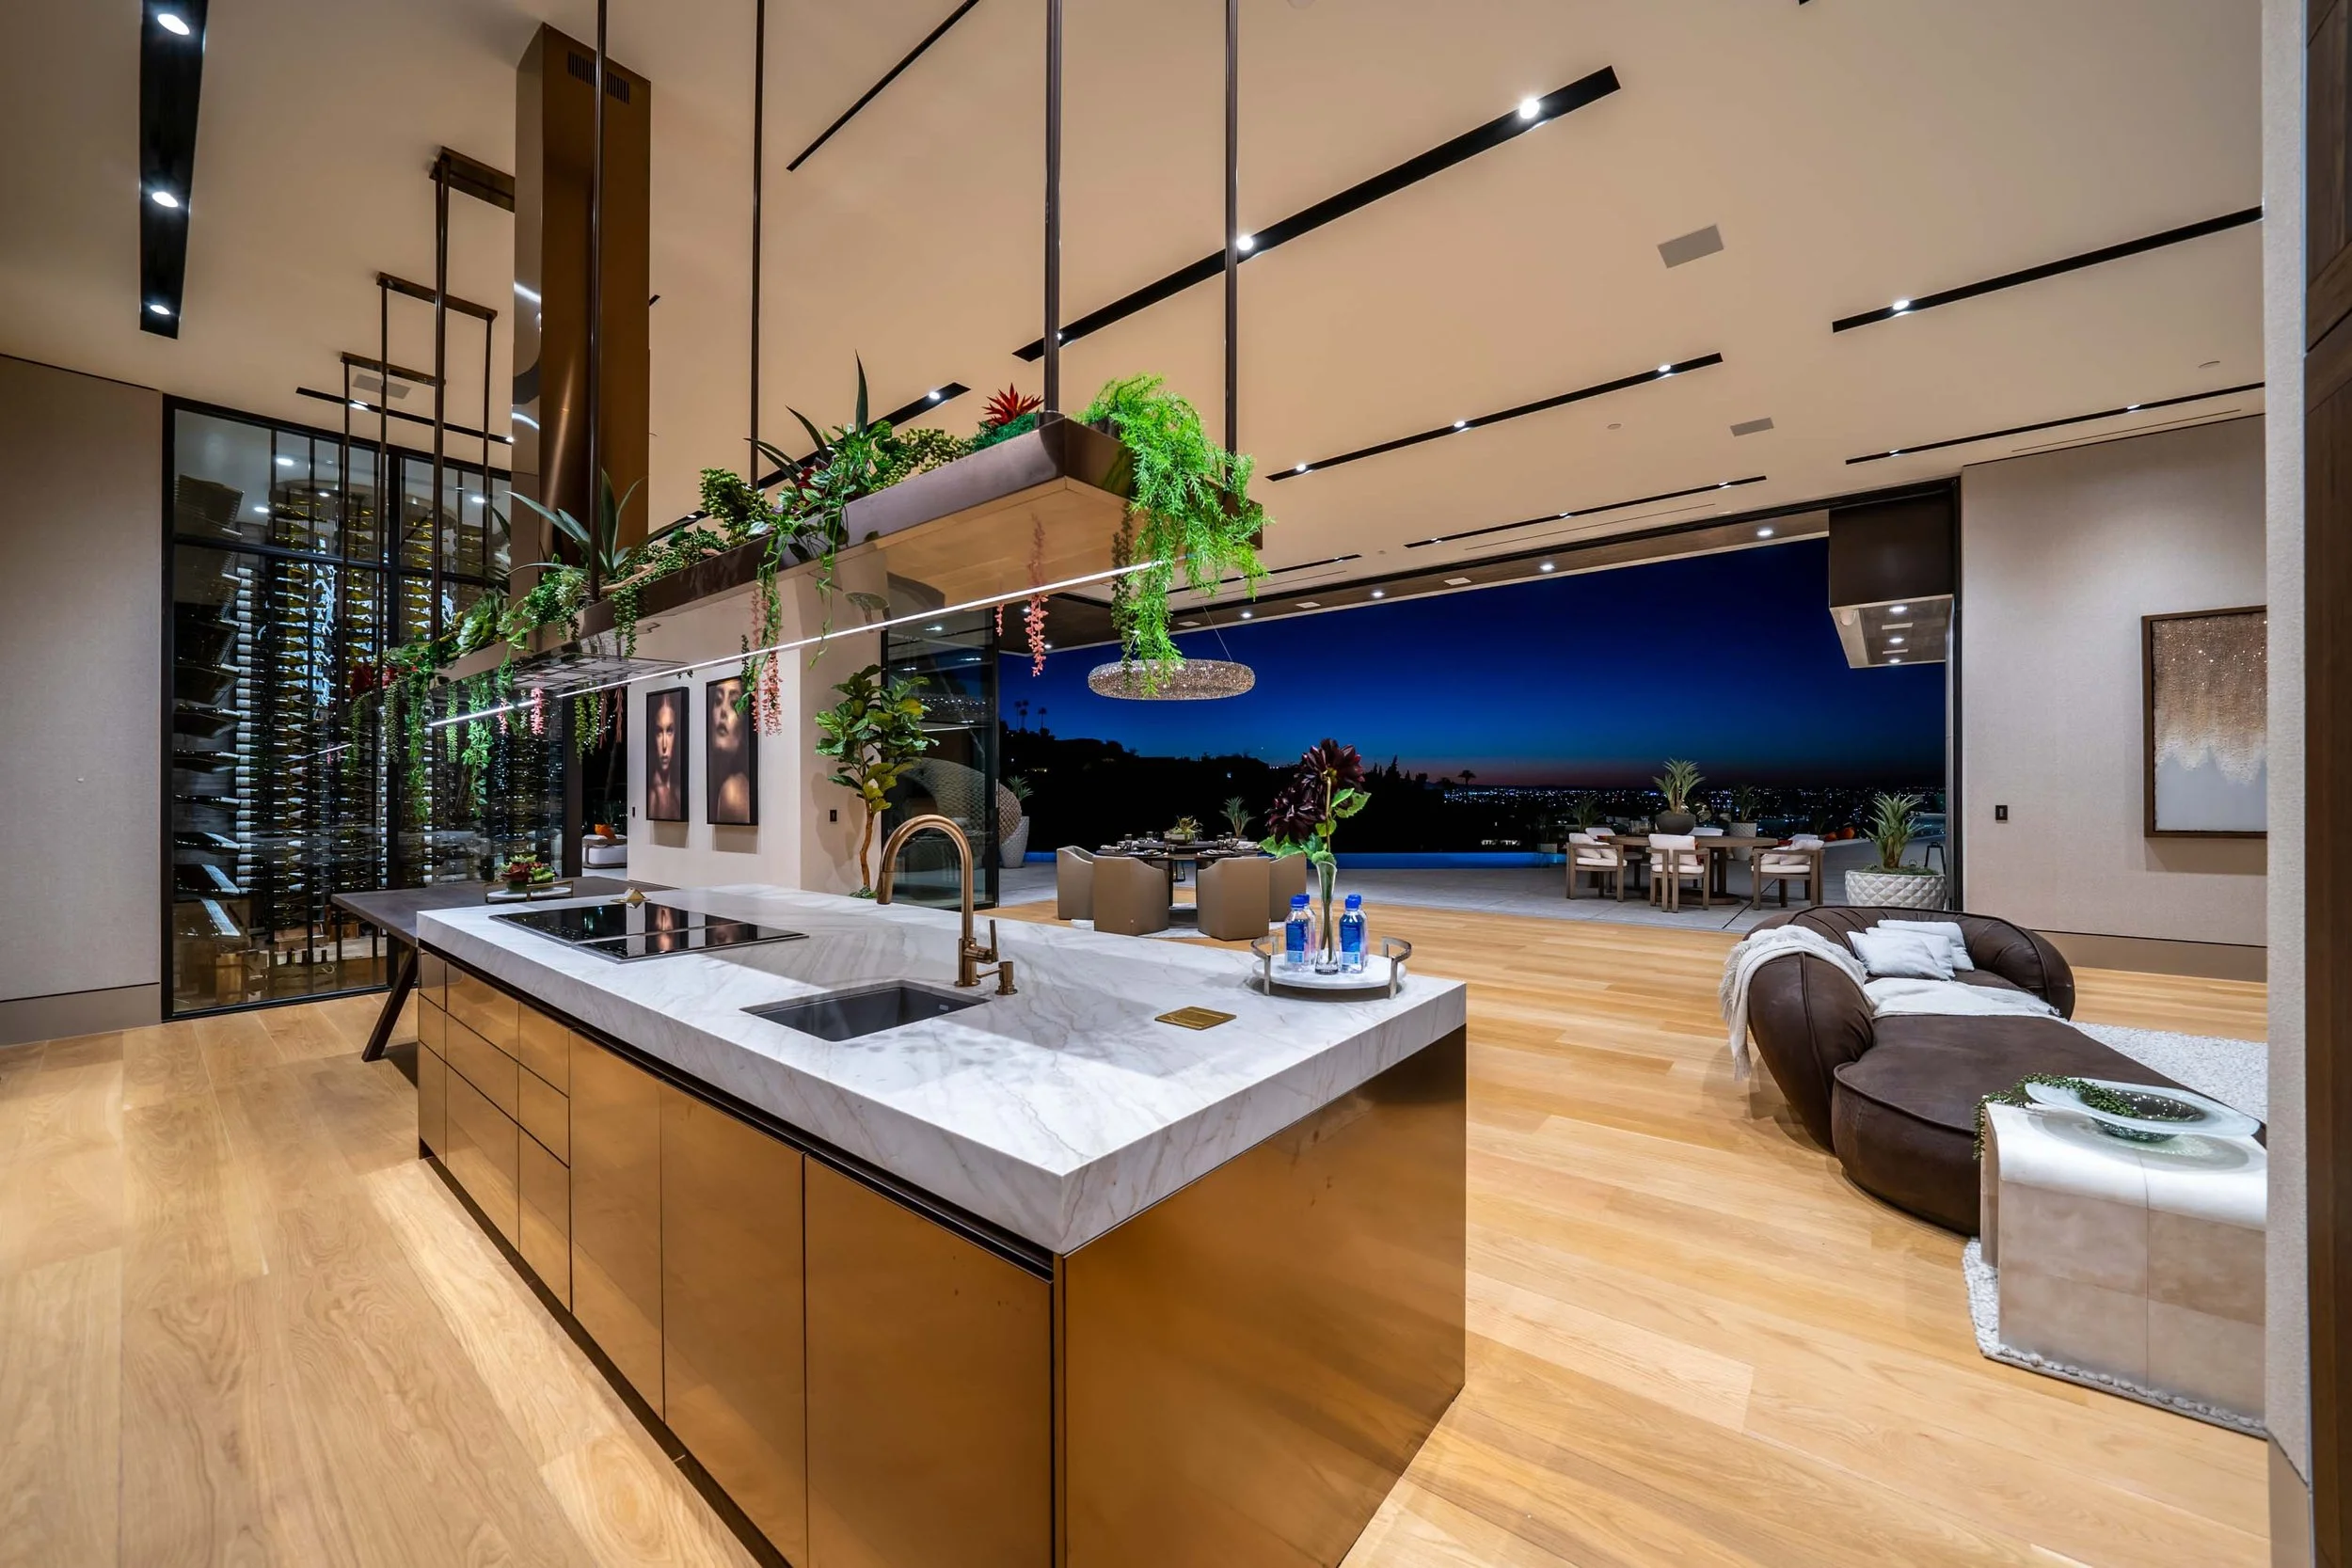
The Flicker Estate kitchen photograph shows the island, cabinetry, suspended planting, and the opening toward the terrace. It illustrates why the camera position and the relationship between interior and exterior brightness need to be considered together. The correct approach depends on the room and the intended result, not one preset applied to every property.
Keep proportions believable and vertical lines straight
A level camera provides a useful starting point for architectural compositions. Check door frames, wall corners, and cabinetry as you work. Leave enough room around the composition for modest perspective correction without losing important edges.
Use a lens wide enough to explain the space while preserving believable proportions. An extremely wide view can stretch furniture near the edges and make distances difficult to judge. Moving the camera or making two complementary photographs may explain a room better than forcing everything into one frame.
Camera height also changes the story. A lower position may show a furniture arrangement well but reveal too little of a kitchen worktop. A higher position may clarify a layout while showing more ceiling fixtures or floor than needed. Choose the height for the subject and inspect the edges before capture.
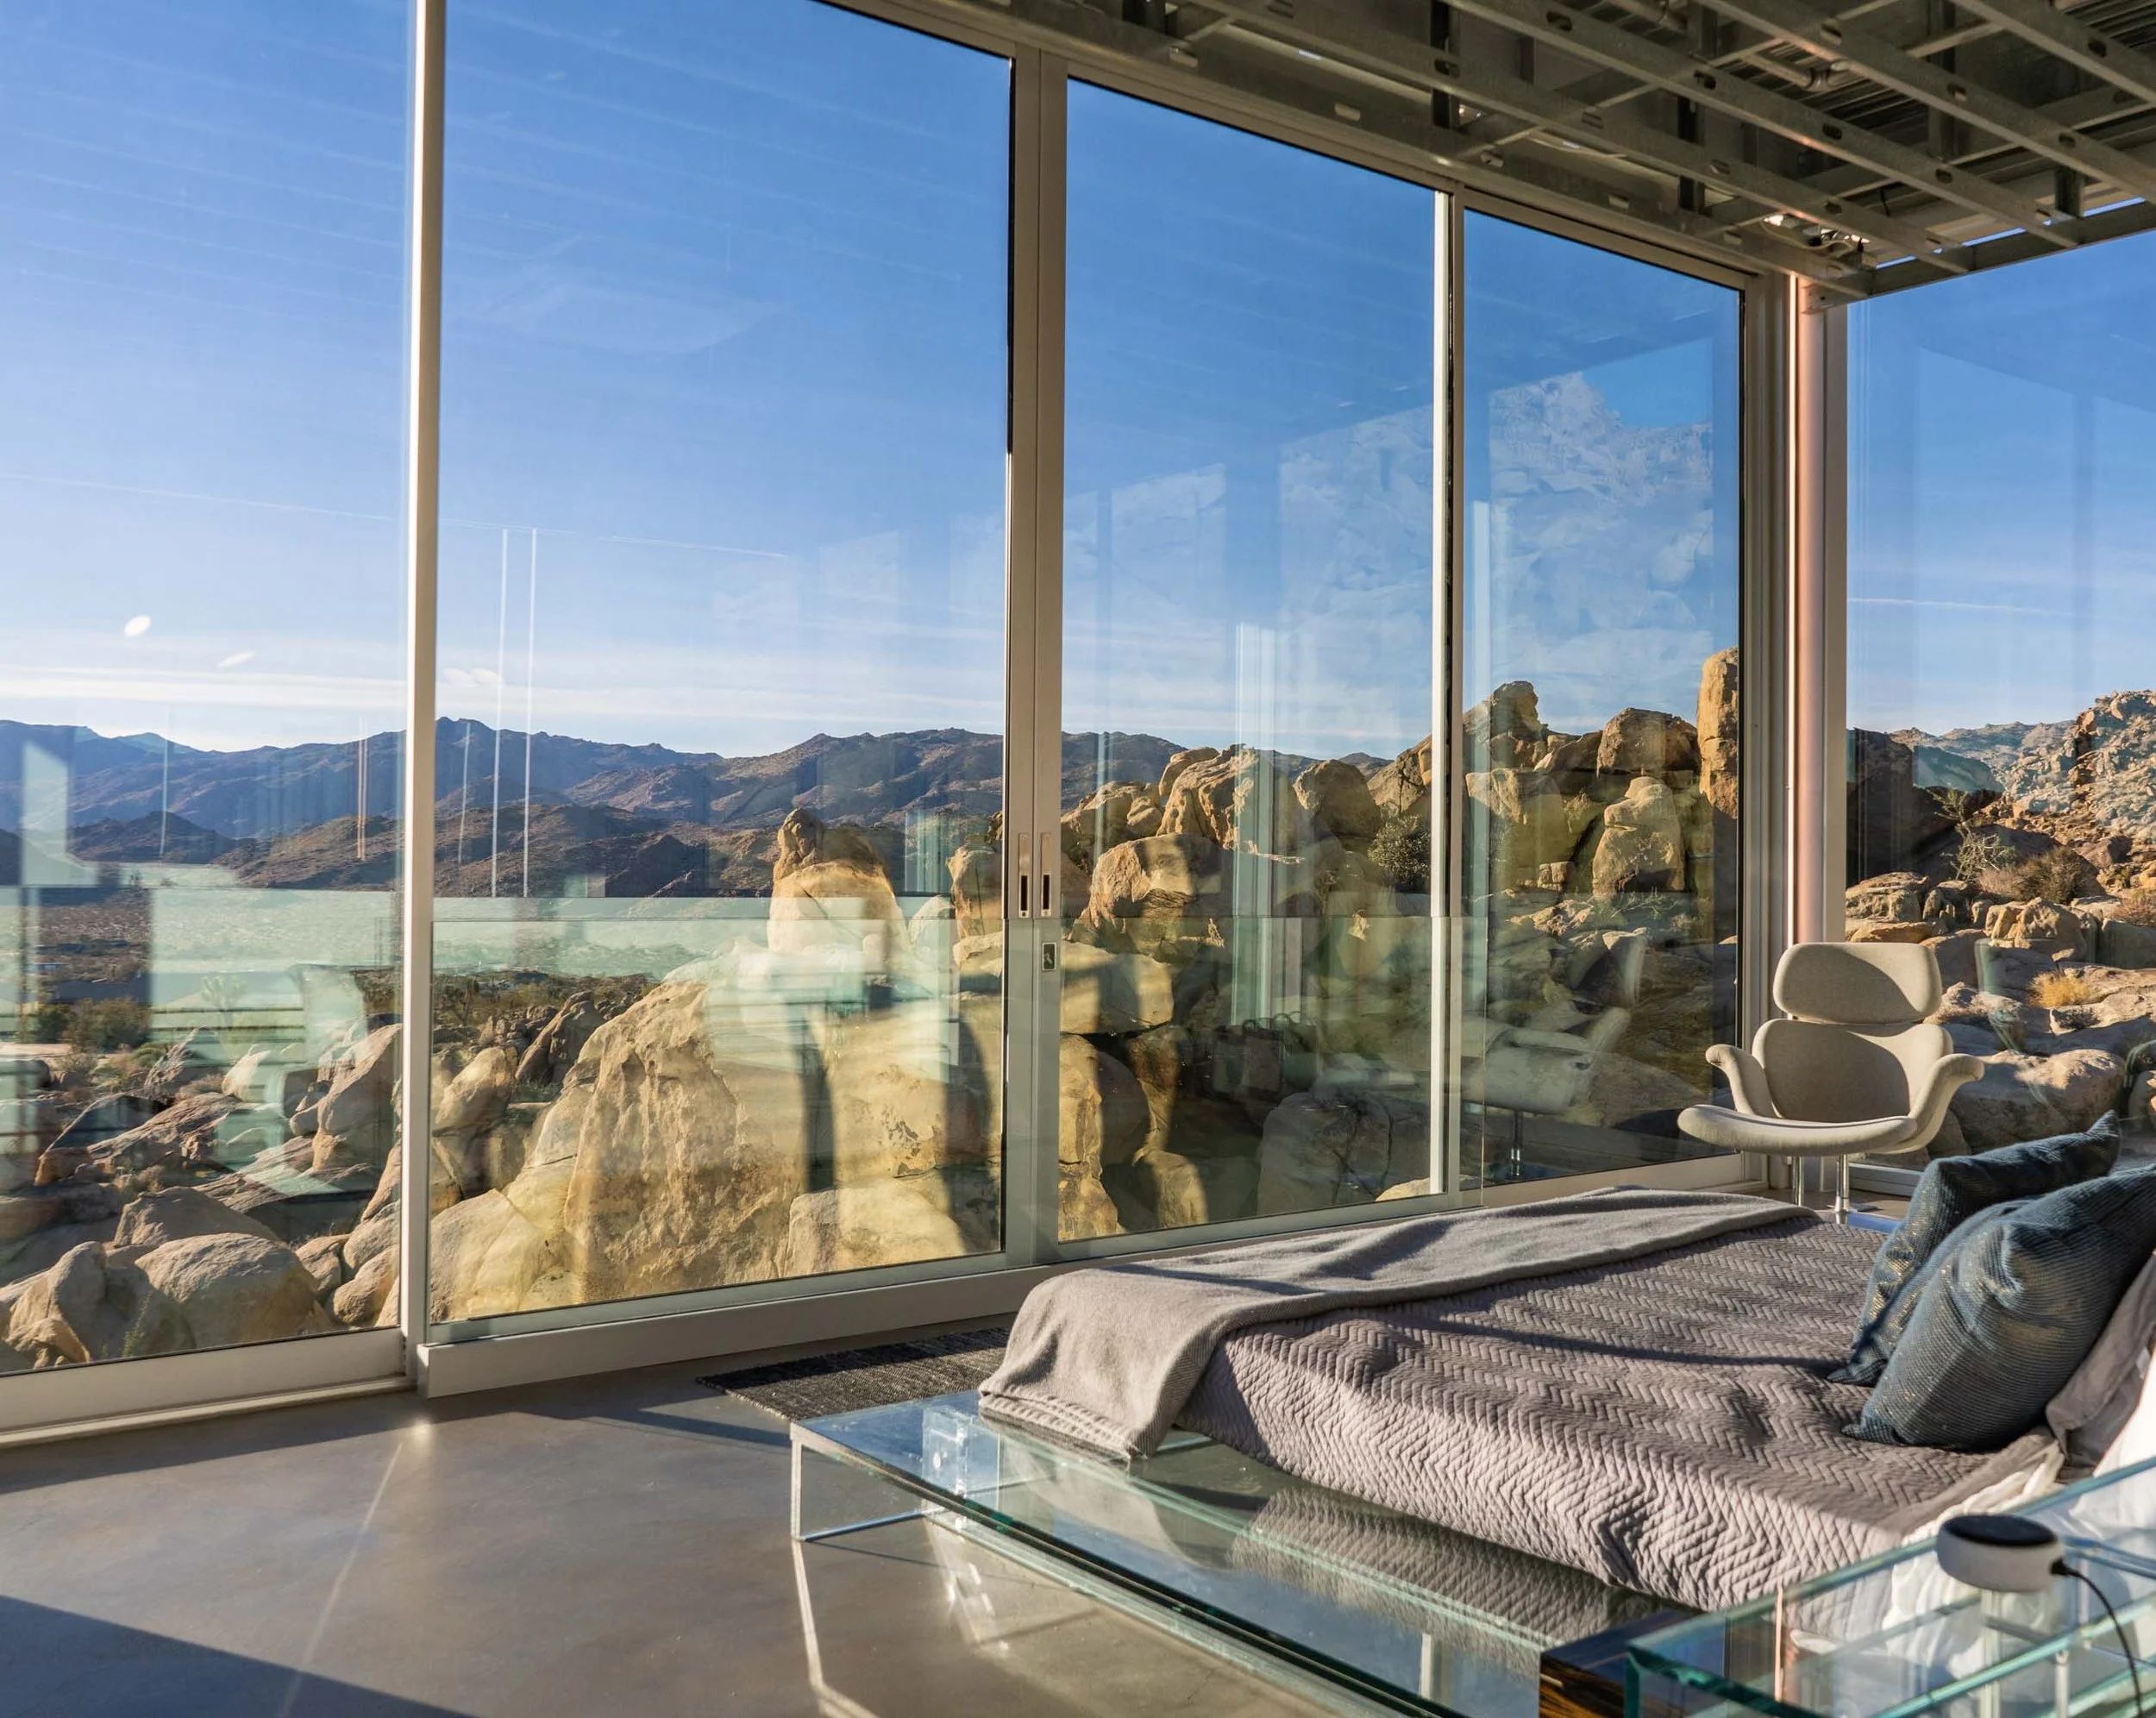
At The Invisible House, the bedroom photograph includes the bed and surrounding desert through the glass. The view is part of the room's character. A tighter crop of the bedding would miss that relationship, while a wider frame is only useful if it still describes the room accurately.
Balance windows, reflections, and mixed lighting
Windows, polished stone, mirrors, and glass partitions need deliberate attention. Check whether the camera or crew appears in a reflection. Small changes in position can keep the reflection clear while preserving the room's geometry. Review the entire frame, including glass cabinet doors and metal fixtures.
When a room is much darker than the view outside, capture the information needed for a balanced final image. Depending on the space, that may involve multiple exposures, supplemental lighting, or a different capture window. The finished photograph should still look like the same room, with natural transitions between interior and exterior.
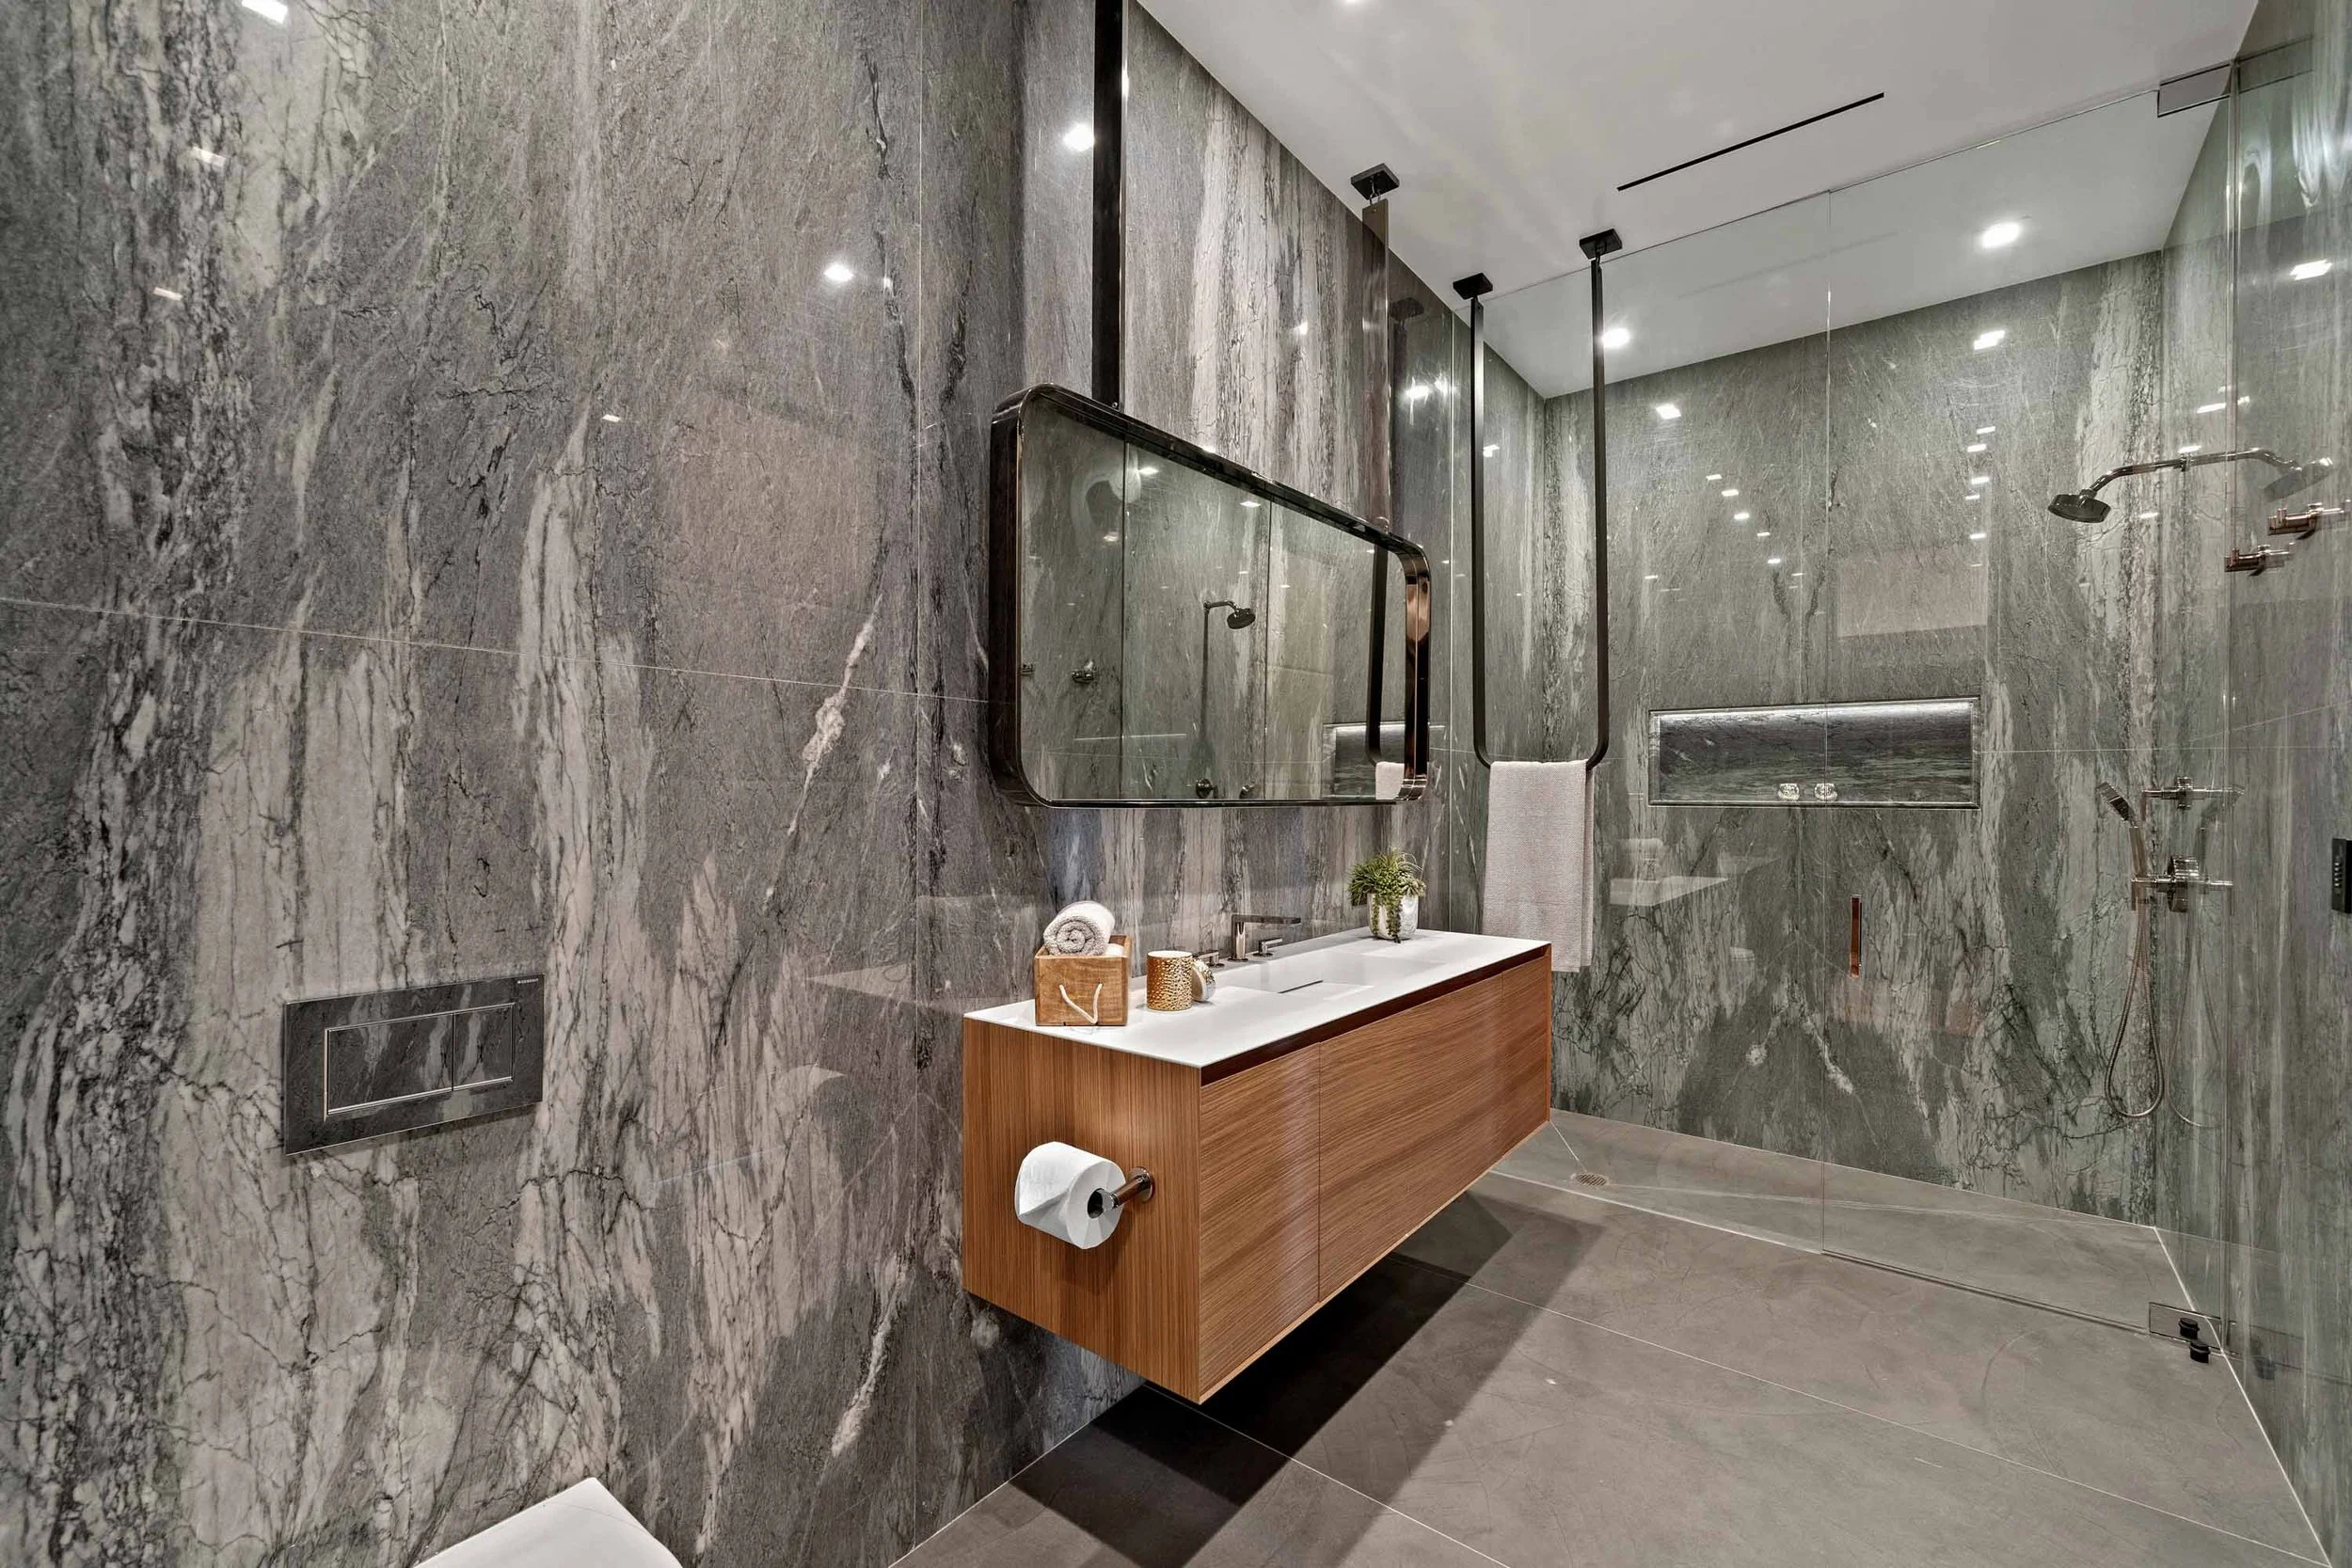
The Flicker Estate bathroom pairs veined stone, glass, wood, and a suspended mirror. This type of room benefits from careful reflection checks and restrained editing. Keeping detail in the materials is more useful than making every surface equally bright.
Plan daylight, twilight, and aerial views as separate deliverables
Daylight photographs explain exterior materials, landscape, and the relationship between buildings and outdoor areas. Twilight can show architectural lighting, illuminated interiors, and evening use of terraces or pools. Decide which of those questions matters before allocating time to both.
Prepare the evening setup in advance. Check lighting zones, water features, access to terraces, and any furniture changes before the light window becomes short. Confirm which views take priority if conditions change. Our Flicker Estate project documents capture across daytime, twilight, and sunrise, while Nightingale's photography spans multiple times of day. That is evidence of those assignments' scopes, not a requirement for every house.
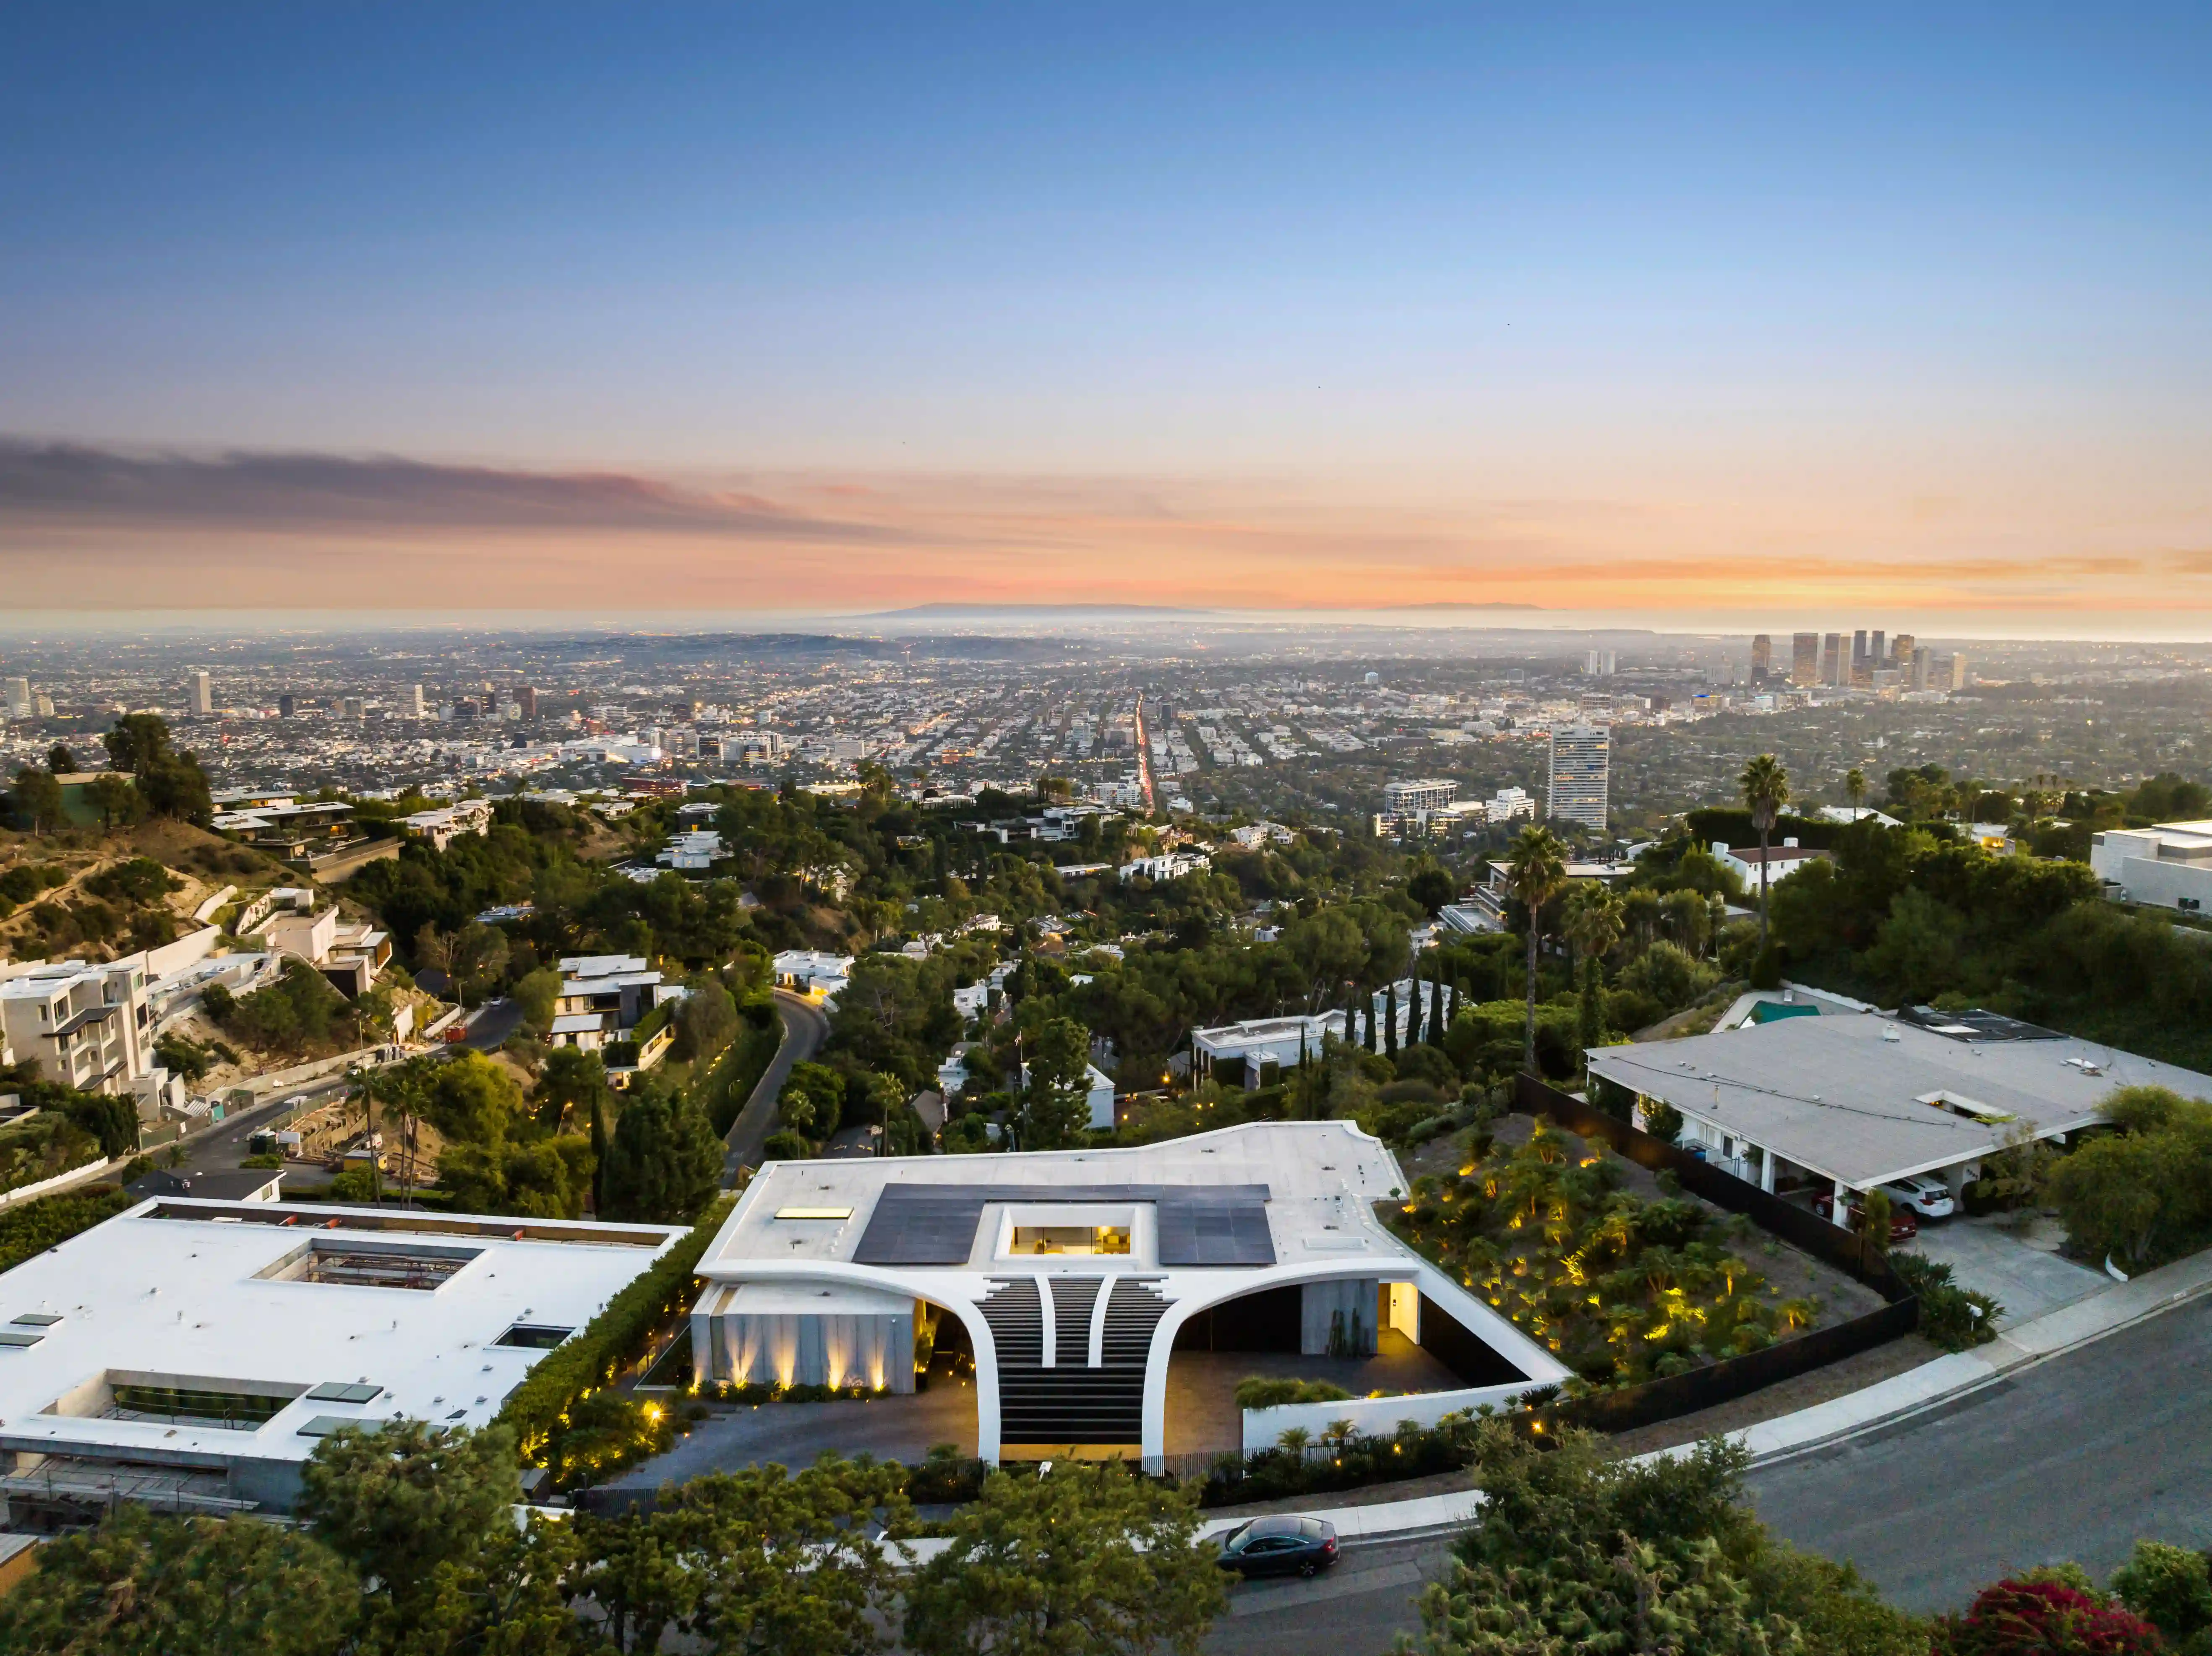
Aerial photography is useful when the site itself needs explanation. The Nightingale view below places the residence within its hillside setting and the wider city. Ground photographs are still needed to explain entrances, interiors, and usable outdoor spaces. Confirm feasible flight coverage before treating a particular aerial angle as a required deliverable.
Add details that explain the design
Once the main spaces are covered, select details with a clear purpose: a material junction, lighting installation, stair profile, or built-in feature. These photographs can support an architect's portfolio or break up a long campaign sequence, but they should complement the views that explain the home.
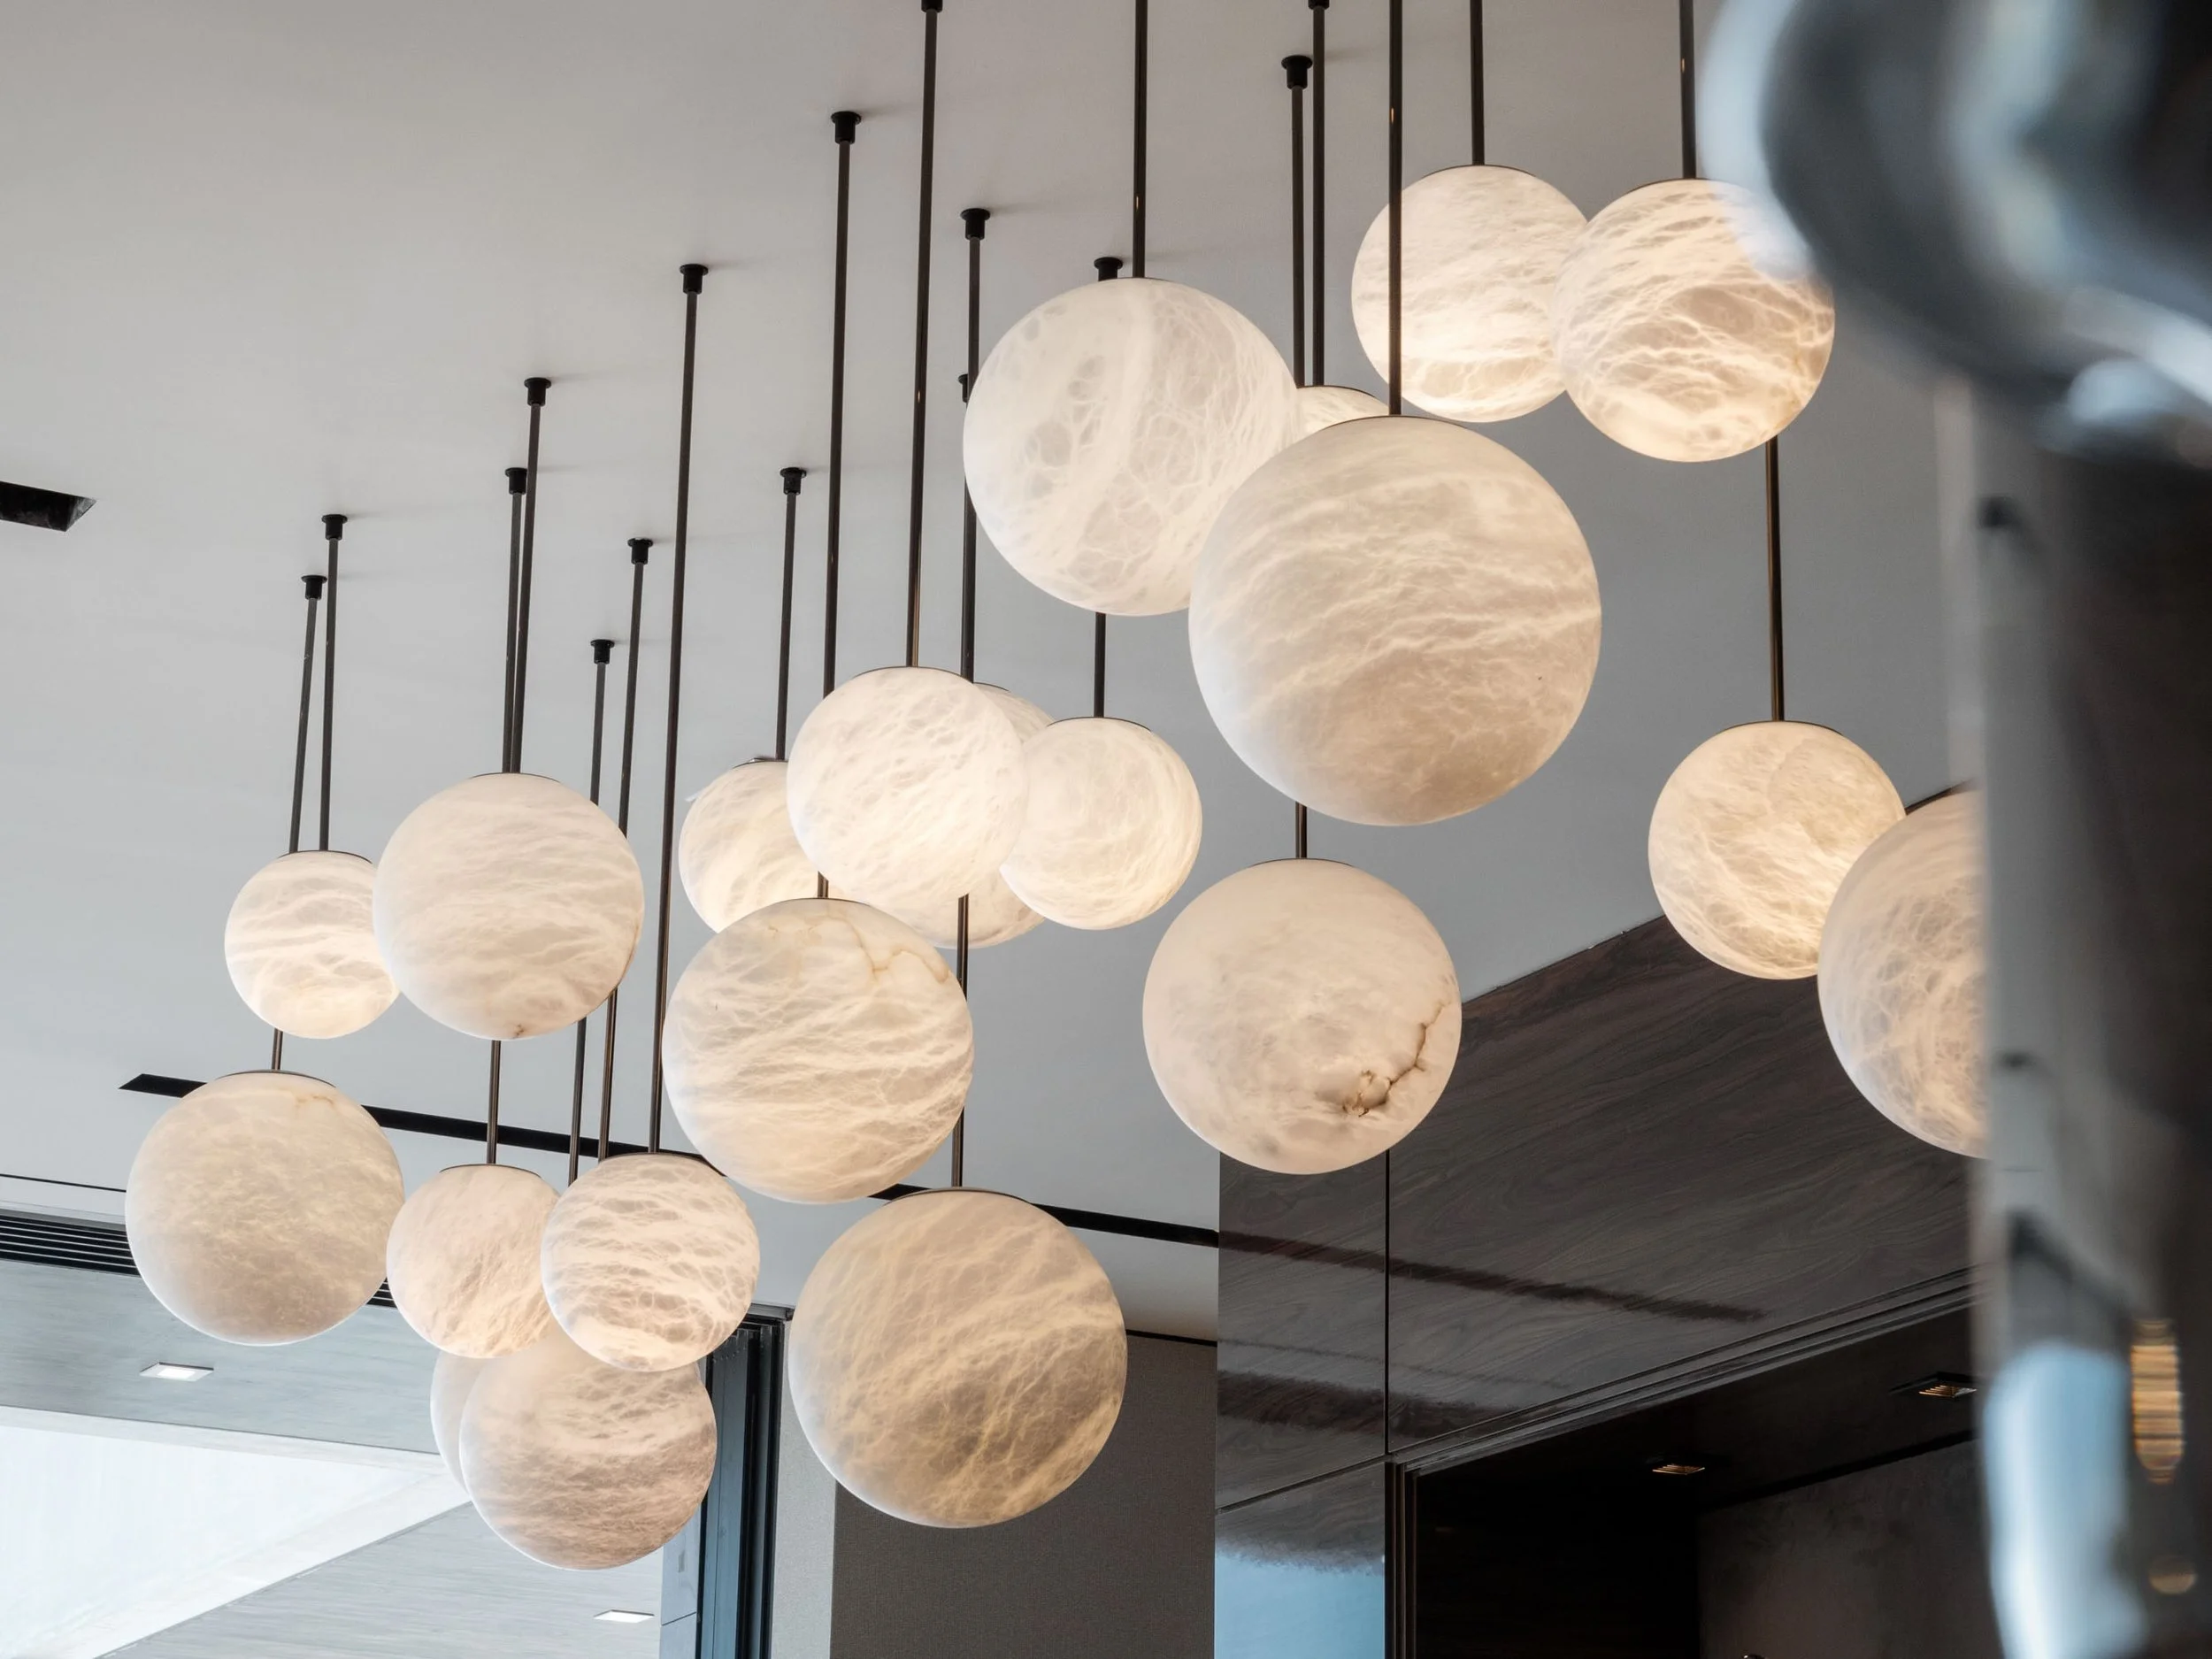
The pendant-light detail at The Flicker Estate shows the texture and arrangement of the fixtures. Placed after a room overview, it gives the viewer a closer look at something already understood in context. A detail on its own cannot establish which room it belongs to or how large that room is.
Edit accurately and prepare files for their actual use
Review the library as a set. Keep related rooms consistent in color, contrast, and brightness, and correct distracting perspective without reshaping the architecture. Preserve material texture. Avoid making walls, skies, landscaping, or views look materially different from the property being presented.
Agree on post-production requirements before capture, including any requested cleanup or separately labeled visualization work. Do not silently present a proposed renovation or added feature as an existing part of the house.
Plan exports around the actual placements. A wide website banner, a property gallery, a printed brochure, and a vertical social post may need different crops. Ask for current platform specifications and identify images that need room for text. Keep a full-resolution master library and clearly named delivery folders so the marketing team can find the right room and orientation.
Questions to settle before booking
How many photographs does a luxury house need? Build the count from distinct spaces and campaign uses. Add views when they explain layout, a feature, or a different lighting condition. The home's size alone does not determine a useful image count.
Should the home be staged? It should be presented intentionally. Some briefs need furnished rooms; an architecture assignment may call for a more restrained setup. Agree on the look and responsibility for styling before shoot day.
Do we need both photography and video? Photography lets viewers inspect individual spaces. Film can show movement and connections between them. Our Kaizen House Malibu film is an example of a residential video assignment focused on the home's design and atmosphere from day into night. It is a separate production decision from still-photo coverage.
Can everything be captured in one visit? That depends on readiness, access, the number of spaces, and the light windows required. Confirm the scope and priorities before setting the schedule rather than assuming every room and every lighting condition will fit.
Plan your residential photography
For a useful proposal, send the property address, purpose of the imagery, priority rooms, intended channels, readiness date, and delivery deadline. Include reference photographs and flag any architectural features or views that must be shown. Review our photography services, architecture portfolio, and production FAQs for more context.
We can build a scope around the finished photographs, films, and aerial coverage your project needs. Contact Clearform to plan your residential shoot.


